Account Manager
L'Account Manager è un estensione a pagamento dell'Account Premium volta a facilitare la gestione dei villaggi per i grandi account. E' quindi disponibile solo per gli account con minimo 20 villi.
Puoi attivare l'Account Manager utilizzando i tuoi Punti Premium. Per farlo, nel menu "Premium" clicca su "Account Manager".
Panoramica
Nella schermata di Riepilogo dell'Account Manager sono riportate informazioni riguardanti lo stato del tuo Account Manager e i lavori che sta svolgendo attualmente. Ogni box è riferito ad una sezione specifica dell'Account Manager e puoi riorganizzarli trascinandoli nella posizione più comoda.
Cliccando sull'icona che appare in alto a sinistra di ogni box è possibile configurare il numero di voci da visualizzare.
Gli ultimi saccheggi
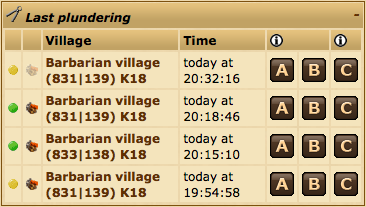
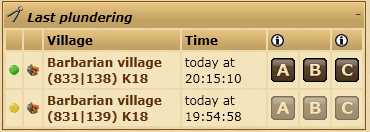
Questo widget può essere utilizzato insieme all'Assistente Farm per inviare facilmente attacchi ai villi saccheggiati recentemente. Visualizza i villaggi barbari che hai attaccato e svuotato negli ultimi tempi.
Per maggiori informazioni sulle icone A, B e C dai un occhiata all'Assistente Farm.
Panoramica villaggio
Nella panoramica del villaggio, i pallini colorati indicano lo stato del gestore truppe, del gestore villaggi a del gestore mercato. Un pallino verde indica che il gestore è attivo nel villaggio. Un pallino grigio mostra che non ci sono incarichi pianificati, mentre un pallino giallo indica che il villaggio è gestito, ma che attualmente il gestore è in pausa.
Cliccando un pallino verde o giallo puoi mettere in pausa o riavviare il gestore di quel villaggio, mentre cliccando un pallino grigio verrai portato alla schermata dell'account manager di quel villaggio.
Templates di costruzione
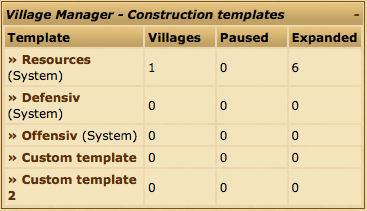
La sezione templates di costruzione offre una panoramica di tutti i templates del tuo Gestore Villaggi.
Puoi vedere il numero di villaggi assegnati ad ogni template, quanti di questi sono in pausa e il numero di costruzioni in coda.
Avvertimenti e raccomandazioni
Se, ad esempio, la tua fattoria ha raggiunto la capacità massima, o il magazzino è pieno, verrai avvisato in questa sezione.
Notifiche
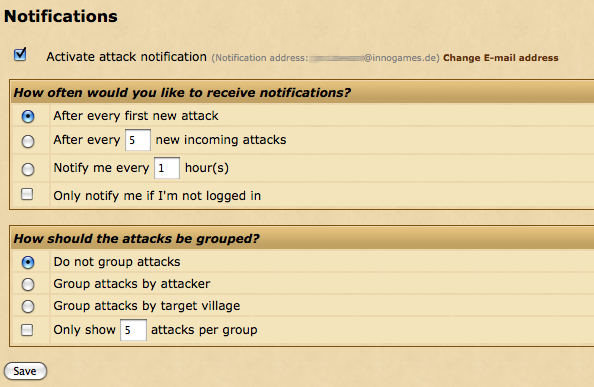
Nella schermata delle notifiche puoi impostare l'account manager in modo che ti venga inviata una email quando ci sono degli attacchi in arrivo. Per attivare le notifiche d'attacco devi spuntare la voce che dice "Attiva le notifiche d'attacco".
Le impostazioni sono divise in due sezioni.
Con quale frequenza desideri ricevere notifiche?
La prima parte del form gestisce le condizioni in base alle quali vorresti ricevere le email di notifica per gli attacchi.
| Dopo ogni primo attacco | Verrai avvisato ogni volta che il contatore degli attacchi in arrivo passerà da 0 a 1. |
| Dopo ogni (XX) attacchi in arrivo | Riceverai una notifica ogni volta che ci saranno (XX) attacchi in arrivo. |
| Informami ogni (XX) ora/e | Riceverai una notifica ogni (XX) ore. |
| Informami solo quando non sono online | Se questa voce è spuntata verrai avvisato solo quando non sei loggato, o se il tuo account non è attivo. |
Come desideri raggruppare gli attacchi?
Questa parte del form si occupa di quello che vorresti visualizzare nelle notifiche d'attacco.
| Non raggruppare gli attacchi | Gli attacchi saranno visualizzati in ordine senza raggruppamenti. |
| Raggruppa gli attacchi in base agli attaccanti | Gli attacchi saranno raggruppati in base al nome dell'attaccnte. |
| Raggruppa gli attacchi in base al villaggio. | Gli attacchi verranno raggruppati in base al villaggio a cui sono indirizzati. |
| Mostra solo (XX) attacchi per gruppo | La notifica includerà solo (XX) attacchi per ogni gruppo. |
Gestore Villaggi
Il Gestore Villaggi può essere utilizzato per automatizzare la coda delle costruzioni. Puoi anche scegliere il livello da raggiungere per ogni costruzione e l'ordine della coda usando il sistema di templates.
Gestione dei Templates
Quando apri il Gestore Villaggi viene visualizzata la schermata del Gestore Villaggi. Per gestire i tuoi templates clicca su Gestisci templates.
Templates di sistema
Il gioco offre tre templates di default che puoi utilizzare. Questi templates non possono essere ne modificati ne cancellati.
I templates di sistema sono:
- Risorse - Generico e ben fatto, incentrato sull'immagazzinamento delle risorse e sull'ampliare gli edifici fino al livello 30.
- Difensivo - Per i villaggi che producono truppe di difesa.
- Offensivo - Per i villaggi che producono truppe d'attacco.
Creare il proprio template
Nel caso in cui i tre templates di sistema non soddisfino le tue necessità, puoi crearne uno tuo e personalizzarlo. You can create your own customized template if the three system templates do not suit your needs. To do so, fill in a template name under the Create template section and choose either to start from scratch by copying from an empty template or copy an existing template.
Viewing, renaming and deleting templates
Below the Create template section you will find a list of your existing templates. The building levels shown in the table are the target building levels for when the Village Manager has completely finished working on your village.
You can click the ![]() icon to rename a template or the
icon to rename a template or the ![]() icon to delete. Note that system templates cannot be deleted or renamed.
icon to delete. Note that system templates cannot be deleted or renamed.
To view or edit the order of a template click on its name.
Editing templates
Just like on the previous page the Summary section will show the target levels for each building.
Below this, the Building queue shows the exact order the buildings will be upgraded.
The items in the Building queue list show the building to be upgraded, how many levels it should be upgraded, and the level the building will be after the upgrades have finished.
You can delete upgrades from the queue by clicking the ![]() icon. If you wish to change the order of the queue you can click and drag on the
icon. If you wish to change the order of the queue you can click and drag on the ![]() icon.
icon.
However, unlike other sections of the game your deleted/rearranged queues are not immediately saved. You need to click on the "Save" button below to save your changes! You also need to click "Save" after adding new orders to the queue.
You also have the option of letting the Village Manager demolish any buildings that are higher in level than the target levels in your template. The Village Manager will only do so if your Headquarters is at least level 15 and your village is on 100% loyalty.
To add new buildings to the queue use the Add order section at the bottom of the page.
The Village Manager will queue buildings in exactly the order shown on this page. This means if you add 20 levels of Barracks upgrades in one go, then the Village Manager will do all 20 levels in a row before moving on to the next building. If you were to add 2 Barracks levels, then 2 Smithy levels, then repeat 10 times then the Village Manager will upgrade both buildings gradually
Assigning templates to and managing your villages
You can assign templates to villages and manage general Village Manager operations from the Manage villages screen.
Assigning or removing a template to a village
To assign a template to one or more villages you first need to select them by ticking the check-boxes to the left of the village names.
Then, making sure Use template is selected in the Action drop down box, choose a template for the adjacent list and click Confirm.
You can confirm that the template was assigned by looking at the Status column for the village in question. It should now say Active.
To remove a template from a village you can do the same as above but by selecting Remove from the drop down box.
You can also assign a template to a village by going into the village's Headquarters, clicking on the Village Manager tab and using selecting a template from the list in the Change template section.
Pausing and continuing the account manager
If you want to save your resources in a village then it is possible to pause the Village Manager without having to remove the template.
You can do this in a similar fashion to adding a template to a village, just either select Pause or Continue from the drop down box.
You can also directly click Pause or Continue in the status column for the village.
General notes
The Village Manager will periodically check your building queue and queue new upgrades when possible. It can sometimes take a few minutes for the manager to start queuing buildings after you've assigned a template.
The manager cannot bypass building, population or resource requirements.
If a village's warehouse is not large enough for the next upgrade in the build order to be queued then it will attempt to queue a warehouse upgrade.
Similarly, if the farm is too small it will attempt to queue a farm upgrade.
The village manager allows you to process up to 50 building orders automatically in each village, after which it will pause and you must reactivate it.
Troop Manager
The troop manager allows you to automate the recruiting of units, by choosing how many units you want to build in each village. When resources are available, the troop manager will automatically recruit units for you.
You can apply troop numbers directly to villages, or you can create and save templates to keep for future use, and apply them to villages later.
Using the troop manager to recruit units
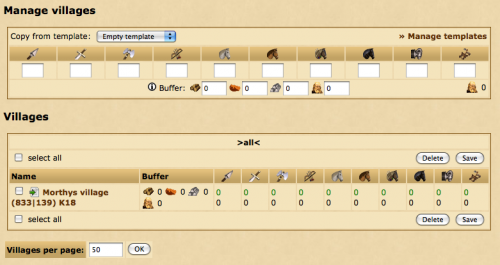
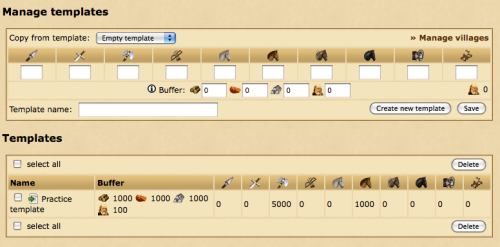
In the "Manage villages" panel at the top of the troop manager screen, enter in the number of units you would like to be built in total for one village. You can also set a buffer if you like, to reserve resources or population space. Once you are happy with your input, in the villages panel below check (tick) the villages you would like to apply this troop build to, then click save to start the recruitment process.
If you have created templates (see below for how to do this), you can apply these to villages instead of inputting a new set of unit numbers each time. In the top panel (the "Manage villages" panel), choose the template you want to use from the dropdown list. Then, in the villages panel, check (tick) the villages you would like to apply a template to. Click the save button to apply your chosen template to those selected villages.
It usually takes a few minutes for your troops to start being recruited if you have the resources and farm space available.
Buffer
You can choose to reserve population slots or resources so they will not be used by the troop manager. For example, if you set your population buffer to 100, then 100 population slots will always be kept free and the troop manager will stop recruiting new units when you only have 100 population slots left in your farm.
Creating and editing your own templates
To edit templates or make new ones, click the manage templates link in your troop manager. This will bring you to the template editor screen.
Creating a new template
Enter in your desired final troop numbers into the units input boxes, and give it a name in the "template name" field. You can also set a buffer value for this template. Once you have done this, click "create new template" to save the new template.
Editing an existing template
To edit an existing template, click the green edit icon beside the name of the template you want to edit in the templates panel at the bottom of the screen. This will insert the template information into the area above. Adjust the troop numbers and buffer as desired, and then click "save".
Applying templates to villages
Once you have created a template, you will need to apply it to a village to get it to start recruiting units. You can do this from the main Troop Manager screen.
In the top panel (the "Manage villages" panel), choose the template you want to use from the dropdown list. Then, in the villages panel, check (tick) the villages you would like to apply a template to. Click the save button to apply your chosen template to those selected villages.
Deleting templates
To delete a template, check (or tick) the box beside the template name, and click "delete".
Market Manager
The market manager allows you to set up automatic resource transfers between your villages that are sent at predefined times.
Creating a new trading route
Please note that when you create a new trading route the sending village is your currently selected village.
To create a new trading route, either enter the coordinates of the target village in the Destination section or use the Favorites, Your own or History helper links on the right.
Next, input the number of resources that should be transferred in the Resources section.
Lastly, you can choose when the resources should be sent. You can select any of the days of the week and you need to enter the time of day the transfer should be initiated.
Resources will only be sent if the village has enough resources and enough merchants are available.
Viewing and deleting a trading route
Once you have created trading routes you can view a list of them at the bottom of the page. You can see the next scheduled sending time to be sure you've entered the correct days and time.
It is not currently possible to edit a trading route.
To delete routes either click on the delete link next to the route or tick the check-boxes next to the routes you wish to delete then click the Delete button below.
Farm Assistant
The Farm Assistant allows you to easily send farming attacks to barbarian villages around you, either directly from the map or from recent attack reports in the Account Manager overview.
You can create two templates to configure different combinations of troops to send on farming attacks. For simplicity, these are called A and B.
Creating a new template
To create a new template click on New template underneath the Edit Templates section. A new section should appear on the right side of the page.
You can give your template a description to allow yourself to easily identify it in the future.
Once you've entered the desired troop combinations click Save to add the new template.
Editing or deleting a template
If you need to change the description or troops inside of a template you can edit it by clicking on the template description under the Edit Templates' section.
If you'd prefer to delete a template and start over from scratch you can click the red cross to the right of the template description.
Using the Farm Assistant from the map
Once you've set up one or two templates you can now use the Farm Assistant on the map. Note that you must have the Context menu enabled.
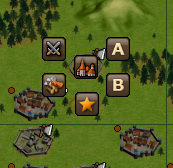
When clicking on a barbarian village you should now notice new icons labeled A and B. These correspond with the templates you created from within the Farm Assistant area. To send an attack simply click on the icon and the troops will be sent with no confirmation required.
Note that this only works on barbarian villages. It is not possible to attack a player owned village without going to the rally point and confirming the attack.
Using the Farm Assistant from the Account Manager overview
You can also use the Farm Assistant to send troops based on your recently received reports. You can do this from the Most recent plunders widget on the Overview.
The widget will show a list of recently received reports where you have attacked a barbarian village and looted resources.
Like the map, you can click on either A or B to send troops from one of your templates to the village.
There is also a C icon, which has a special functionality and does not relate to any of your templates. Clicking on C will use your most recent scout report to attempt to calculate and send the right amount of troops to loot all of the village's resources. You will receive a popup with the exact amount of troops sent.
You can only use the C icon if you have recently scouted the village.

